Blog 1: Gears

Updated: Nov 12, 2024
WELCOME BACK!
Welcome back to Hasnain's design journey, which has now upgraded from solely product design to including product development. After a long break and "gearing up" (LOL) after the first semester, I'm back to further this undertaking. In the previous series of blogs, I set myself some goals that at the start turned out to be a pretty meaningful exercise for myself to know the WHY? of the things that I did during that portion of my journey. So to continue that tradition I'll set 3 main things I want to get out of this journey below.
Goal 1: I want to grow even more competent with my hands-on skills and put my theoretical knowledge into use in a meaningful way
During my previous set of blogs, I picked up a bunch of cool and interesting new skills like 3D modeling, 3D printing, laser cutting, and engraving. I want to continue to learn to use such tools and apply them in actually meaningful ways.
Goal 2: I want to learn to see the world through a more "engineering" tinted set of glasses,
I have grown to admire just how amazing some simple inventions are. An example of this was during the time we disassembled the coffee maker last semester, how simple things like a check valve can make a complex task so simple. Another instance is when we were discussing how a kettle knows when to turn itself off using the vapor sensor in its handle. It inspired me to try and learn to see the world in the same way as these inventors and designers did to try and emulate their genius.
Goal 3: HAVING FUN WHILE I LEARN!
For those of you who have followed me from the start, WELCOME BACK! For those of you who are new, I'll do a brief intro before diving right into the main course of learning served with a healthy side serving of bad jokes.
Wait a minute? Who are you?
My name is Hasnain and I am a year 2 Chemical Engineering student at Singapore Polytechnic.


My hobbies are boring things like reading, listening to music and photography. I can play the melodica and the guitar but not as competently as I would like to. My favorite authors are Osamu Dazai and Slavoj Žižek (yeah I had to copy-paste this from Google)

Hopefully, that should be enough to give you guys a rough idea of the guy behind the keyboard on these blogs. If you're interested in learning more about me, too bad I'm not sharing anymore.
ALL GEARED UP.
Now that we have gotten all the not-so-important stuff out of the way we can dive into my first endeavor in the new chapter of my journey. GEARS! "What in the world is a gear?" Well, by definition it is described as "A MECHANICAL DEVICE THAT TRANSMITS ROTATIONAL FORCE FROM ONE MACHINE TO ANOTHER".

But to translate that into English, it is essentially a circle that can interlock with other circles with teeth kind of like circular legos to make stuff move in certain directions. You've probably had some interaction with them without realizing it. Their most prominent use is in bicycles. A gear module is a ratio used to describe the size of a gear. It is calculated by taking the pitch diameter (denoted as d) over the number of teeth (usually denoted as N) it has. A gear's module is kind of like a shoe-size guide, it tells us how big its teeth are relative to its diameter.


For the diagram above. N = 30 and d = 30. (d is measured by imagining a circle passing through the center of all teeth) So M = 30/30 =1 Hence the Module of the gear is 1. "Remind me how this is useful again?"
This relationship is like me on a Monday morning, it won't make sense until we make it make sense. By examining the equation it can be said that a gear's module is directly proportional to its pitch circular diameter and inversely proportional to the number of teeth on the gear. This means that when the diameter increases but the number of teeth is held constant, the gear's module would increase but so would the size of the teeth so that they can cover more of the circumference. The inverse is also true, when the number of teeth increases but the pitch diameter is held constant, the size of the teeth would decrease to cover the same circumference. Therefore, we can make use of this when it comes to assembling multiple gears. When we assemble gears, their modules must be the same value, so that their teeth can interlock in a way that allows them to move in tandem. To prove this mathematically we can describe two different gears and equate their modules.

What kind of doctor would be great with gears? A dentist.
(get it? Because of all the teeth...)
Now that we've laid some foundation down to better understand gears let's see what we can accomplish when we put multiple of these circular legos together. "So what, spin only. Got anything to see meh?"
Of course, there's more to it. Gear Ratio more commonly known as speed ratio describes the ratio of the number of revolutions of a driver gear to the number of revolutions of a driven gear. "Eh wait wait wait. Why got the driver then got driven then where the passenger?"

A driver gear in this case refers to the gear that is the source of power or rotation and the driven gear is simply the one receiving the turning force. Using the image on the right to illustrate my point. If the gear that is being turned by a source of power is the blue gear then the blue gear is the driver and the orange gear is the driven. The inverse is also true so it is all relative to the driver gear. Gear ratio can also be calculated by taking the ratio of the number of teeth on the driver gear over the number of teeth on the driven gear. It is also related to torque (denoted as T) and the rotations per minute (RPM) of the gears.

(Look familiar? look back at the earlier relationship and you'll notice that pitch circular diameter is also another way to calculate gear ratio.)
"Can you just summarise already, I fell asleep a while ago"
IN SUMMARY! Upon examining these relationships we can observe that when Gear Ratio Increases
Output torque increases
Output RPM decreases (moves slower)
Hence the inverse must also be true thus when Gear Ratio Decreases
Output torque decreases
Output RPM increases (gears move slower)
To put it simply, when a small gear drives a bigger gear you get more torque and when a bigger gear drives a smaller gear you get more speed.
If the last two sections put you to sleep, you're probably not alone. Don't worry because we're finally getting to the fun part.
I'm shifting down a gear so I can let my engine cool off
By engine I mean brain. The last two sections had me nearly crashing out.

Speaking of cooling off. What's one thing Singaporeans nowadays cannot live without? Portable fans, they're super advanced now with some of them looking and functioning more like jet engines than something to cool ourselves down with.
LOOK AT IT. THIS THING CAN PUT OUT AIR AT 19M/S!
For reference that is a class 8 out of12 on the Beaufort Wind Scale and is described as follows

The prospect that all of this insane wind power is now contained in the palm of people's hands is just absurd to me. Anyway, as a broke student, I'm far too poor to afford such luxuries as a fan that can rival Zeus himself. So the closest thing I've gotten to handle is a 3D-printed hand-powered fan. But maybe with the power of gear ratios, we can overthrow Zeus.


Here are photos of the fan's internals as well as the fully assembled final form.
Sadly its initial design did not come anywhere near close to rivalling the power of a brushless motor. But for something that was 3D printed and put together so crudely, I was pleasantly surprised by how capable it was of pushing air.

As impressed as I was by the mere fact that it worked, I was equally if not more disappointed by the design of the mechanism driving it. It was terribly inefficient requiring that you push and pull the handle to fully crank the gears driving the fan. Honestly, such a mechanism would probably leave you more sweaty than you started if you practically used it to cool yourself off. "If you complain so much then why don't you do something about it"
Fair point. As an engineer such a design that is just begging to be improved cannot be ignored. We must rectify this lapse in design and bring out the fan's full potential. The main issue that I have with the fan is the cranking mechanism. Pushing and pulling is way too much effort to feel a weak and short breeze. The root of this issue lies in the gear not fully revolving after pushing the handle once, causing it not to fully revolve and reset back to the position where a push would turn the gear. After some brainstorming, I came up with two potential solutions to this problem.
Solution 1
Create something that will always reset the crank position to a point where you can continuously push to put power into the gear train.
Solution 2
Modify the handle system in its entirety so the method of transferring energy to the gear train is not dependent on a handle-crank method of putting power into the system.
Sketch of the initial design New and Improved design


I opted for solution 1 and redesigned the cranking system such that it is a partial gear that will slightly spin the gear before resetting itself to its initial position. So all the user has to do is continuously squeeze the protrusion about its pivot.
This design was inspired by looking at various gear artifacts on Thingiverse. Particularly one of a similar fan design by user thinngimaker. Do check out his video on his 3D-printed fan below, I was impressed by his process of improving it print-by-print
This design also includes another layer of compounded gears thus even further reducing the speed ratio meaning the fan will spin even faster. Comparing Gear train gear ratios
Initial Design


Improved Design (Assuming new gears are Z7=10 and Z8=20)


As you can see, this modification to the handle not only improves the quality of using it but also enhances its performance. With a lower gear ratio, the fan will now spin faster, push more air, and cool you off even faster! As an engineer, I can now finally say that I am satisfied with the design of this 3D-printed circular Lego fan. Maybe not so satisfied with its appearance. But, then again it's not an engineer's problem.
All this gear talk is making me cranky.
And I'm just a few turns away from starting a revolution.
Now that we have learned how to utilise gears to speed up things let's look at the opposite end of things and see how gears can make us stronger.
In this instance, our goal was to raise a filled-up water bottle 200mm high. Seems simple enough just like with most other things in life. We want to do it by exerting the least amount of effort.
"Just say that you're lazy bro" So to do so we have to arrange the gears that we've been provided with to achieve the highest possible gear ratio. While being limited to only being able to compound twice due to physical limitations of the screwing board. After some trial and error, we came up with the following arrangement.

(Credits to https://geargenerator.com for all the gear diagrams as well as this cool animation)
And here's what it looks like in real life
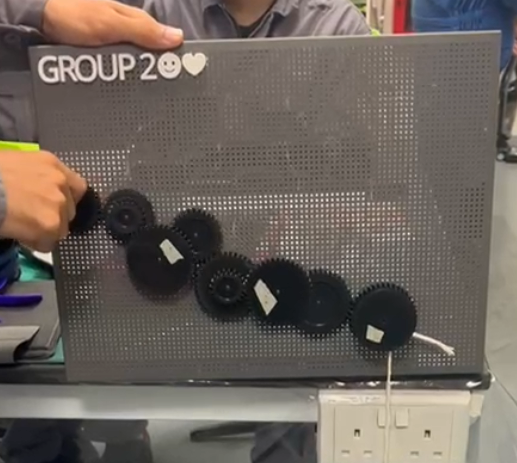
Now we can work out the gear ratio. The maximum we found was to be 26.67 with the set of gears that we were given.

Now that we have the gear ratio calculated.
We can now calculate the theoretical number of rotations needed to lift the bottle.

But this is based on theory. How well does it line up with reality?
In actuality, we counted 57 revolutions. Which was surprisingly close to our calculated value. "Wah spin 57 times so long-winded. May as well just pick up the bottle with your hands" And you'd be right in saying so. But that only really applies in this use case. In a real-world context, such pulley systems with gear trains are used to raise things that may be a couple of dozen tons such that the trade-off of turning a few more times instead of putting in the hard work makes sense.
And the world still revolves on.
Now the time has come for me to introspect and reflect on my learning with regard to these gears activities. In my own experience, I found it very uniquely challenging to learn all this theory and then apply it in a practical sense. We not only have to perform the practical aspects of the tasks but have to back it up with our theory and calculation. I feel that although it was challenging it deepened my understanding of gears at a higher level.
My thoughts on the activities from a group perspective. There were a few painful moments where we didn't quite understand what we as a group were doing wrong and had to work through several iterations of trial and error but at the end of it we as a group came out more experienced and knowledgeable. In this domain, I also have grown more appreciative of the different perspectives and ideas that each one of my group members bring to the table as when it comes to engineering there is no real right or wrong answer. It is merely which is more acceptable to the given circumstances.
In terms of personal growth, I have realised that I am still lacking in the "engineering" mindset and still have a lot of room for growth in that regard. For instance, I tend to accept things as the way they are and work around them instead of working to think in a way where I am open to the idea of changing the things around me as a solution in itself. This often results in me performing tasks rather awkwardly.
AND THAT IS IT FOR BLOG #1 OF CPDD!!! Here I want to appreciate everyone who took the time to read through the whole thing. I hope that some of my bad jokes made you at least smile a bit and brightened your day in some sense.
I hope you're having a good day and continue to do so until I see you again in the next one. GOODBYE


Comments